Table of content
- Introduction
- Required Technology
- Create a Spring Boot Project
- Push Application to Git repository
- Deploy Spring Boot Project to Tomcat Container For Testing
- Install Jenkins
- Jenkins Setup for Maven, Java, Git, Tomcat, Email trigger.
- Setup of Job For the SpringBoot App
Introduction:-
Hi All, The agenda of this post is to get basics information about how we
can make our app from scratch and do the setup for the automatic deployment
via Jenkins in Tomcat container, so that whenever developers do code
checking into the codebase automatic build trigger and latest code get
deployed to tomcat container.
In this tutorial, we will see how can we develop a spring boot project from
scratch, how we can push this project to Github, what are the steps to
deploy this app to stand-alone running tomcat containers.
By the above steps are making sure that our application is running fine and
we are able to deploy in the server and it is working properly after
deployment.
Next, we will see important steps for Jenkins setups and installation of
required plugins for integration of Jenkins with Maven, Git, and tomcat.
After all these steps we will be testing our application for the new
behaviors for every new code changes push to the codebase.
Required Technology:-
To get started working on this project, You should have basic knowledge of
following technologies and Tools
- Java
- Maven
- Spring Boot
- Git Basics Command
- GitHub Account
- Tomcat Server
- Jenkins CI/CD
- Intellij IDE
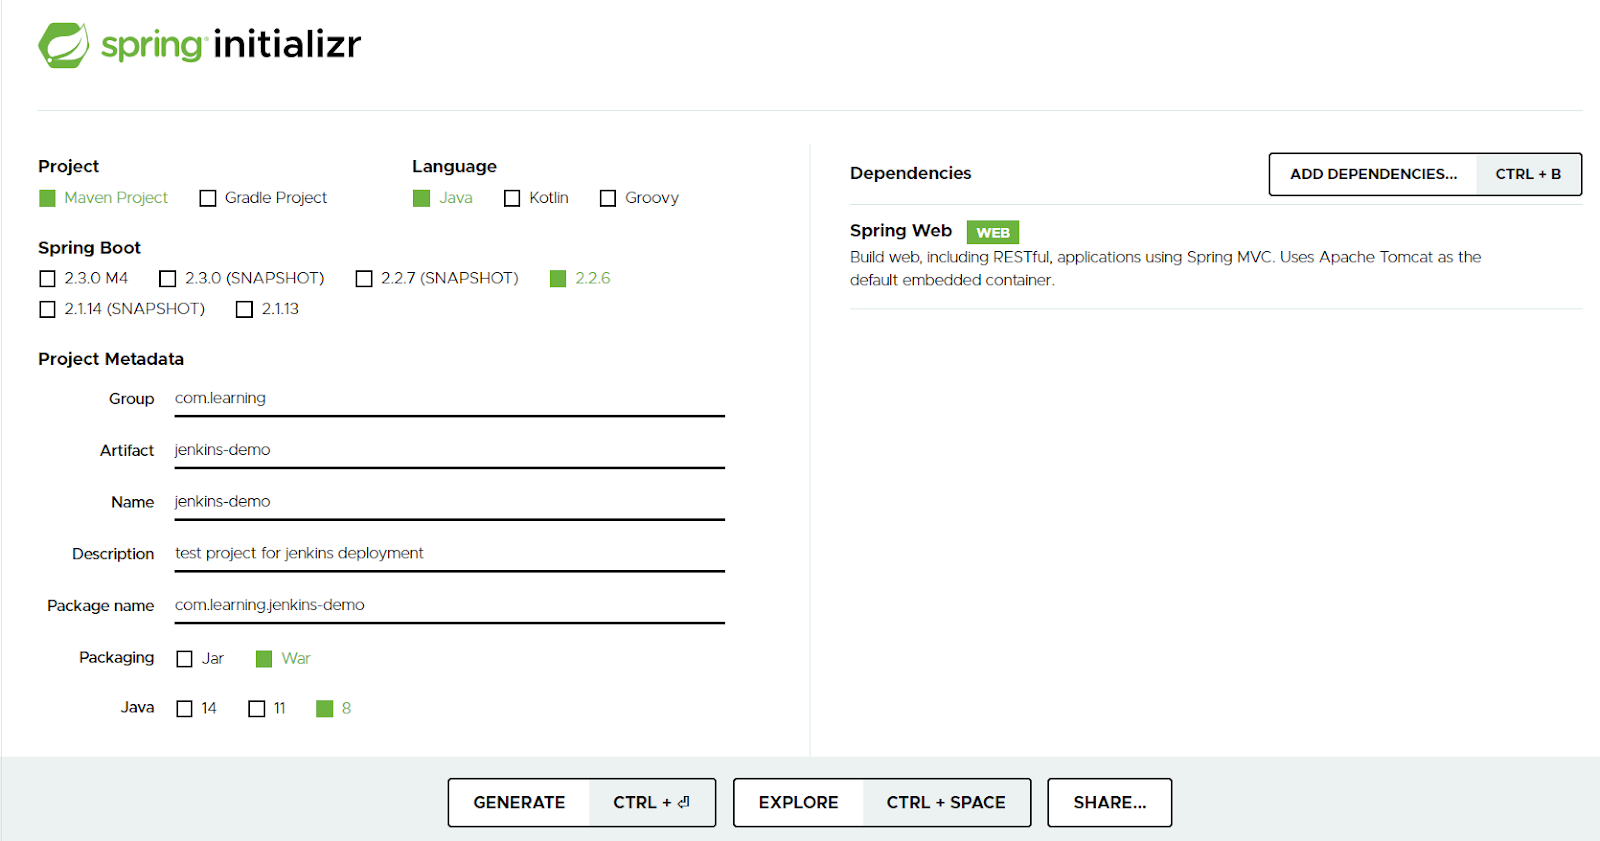
Create a Spring Boot Project:-
Go to URL - https://start.spring.io/
Creat Spring boot Project With below-provided details and click on generate
button
Download and extract the project and import it to IntelliJ.
Create simple Rest API under the src folder.
package com.learning.jenkinsdemo;
import org.springframework.web.bind.annotation.RequestMapping;
import org.springframework.web.bind.annotation.RequestMethod;
import org.springframework.web.bind.annotation.RestController;

@RestControllerpublic class HelloController {

    @RequestMapping(value = "/hello", method = RequestMethod.GET)
    public String getHello() {
        return "Hello working:::::::::";
    }
}
This is a simple rest API with /hello endpoint, which will just
return Hello Working::::::: whenever it will be called.
Add below lines the application.properties file to make sure the app-name
and application running port.
server.port=8081
spring.application.name= jenkins-demo
That’s all for this section we will do testing of this application in next step. Well you can download this project from here - https://github.com/912vinay/jenkins-demoPush Application to Git repositoryI am assuming you having basics ideas about git and github account. in this section we are going
to push our project to GitHub, so that it may be access from anywhere and will be usefull during
job setup in jenkins.
Before pushing make sure there are no errors in your project and it is buidling properly to do that
go to pom file directory location in your CMD and run the command mvn clean install
if it build successfully then we can push our code to Github without worries.
Go to github creat repositoy name - jenkins-demo
Copy the clone url of newly created jenkins-demo reposioty
Go to CMD  for cloing of repo  git clone clone-url-of-your-repo
It will generate folder name jenkins demo , go inside folder and pastesrc folder
and pom.xml file of your spring boot project created earlier.

Run below commands on the cmd

1. git add src
2. git add pom.xml
3. git commit -m "jenkins demo test"
4. git push
Deploy Spring Boot Project to Tomcat Container For Testing
In this we are going setup tomcat and manually deploy aur application war file into tomcat conatiner
and test the application by hitting the endpoint hello/

Download tomcat from - https://tomcat.apache.org/download-90.cgi
Unzip the downloaded tomcat server place at  your desired location in your local system.
Go to config folder of tomcate server to do port change from 8080 to 8081 in server.xml file

<Connector port="8081" protocol="HTTP/1.1"
               connectionTimeout="20000"
               redirectPort="8443" />
Go to tomcat-user.xml file and add below lines to enable login from UI
<role rolename="manager-gui"/>
  <role rolename="manager-script"/>
  <role rolename="manager-jmx"/>
  <role rolename="manager-status"/>
  <role rolename="admin-gui"/>
  <role rolename="admin-script"/>
  <user username="admin" password="admin" roles="manager-gui,manager-script,manager-jmx,manager-status,admin-gui,admin-script"/>
After these changes go bin directory of tomcat via CMD and run startup.bat file to start and to stop shutdown.bat
After start login to UI via URL - http://localhost:8081/  with username/password  - admin/admin
Keep ready war file of SpringBoot project created in step-2 by running command in cmd  mvn clean install
Go to manager app button  and then choose war and click on the deploy button , by this your app will be deployed
After this It will be listed under alrady existing apps  you click on your  app url it will navigate to differnt url (http:localhost:8081/your_war_file_name)
append /hello into this url like (http:localhost:8081/your_war_file_name/hello) you will get your API working properly

That's all in this section we learned how to setup tomcat, configure it , startting and stopping it. and finally deployed the app and tested.
Install Jenkins:-
Jenkins is CD/CD tool, we will use this to automate our build process.
Download the Jenkins - https://jenkins.io/download/
Install the Jenkins as like normal software installation.
By defualt it will run on localhost:8080/ first time login it will ask for setup.
Initial password can be found location -jenkins/secrets/initialAdminPassword
Do the basics setup default plugin installation as these steps are very user friendly to not discussing in details and setup new password.
By running these commands on CMD ,we control the jenkins
Jenkins Setup for Maven, Java, Git, Tomcat, Email trigger.
To setup for a job for our spring-boot project we need lot plugin in Jenkins
Go to jenkins home page > manage jenkins - plugin sections
GitHub integration Plugin -- Help to integrate with GitHub to automatically detects for new changes
Maven Integration Plugin -- Help to do maven related config setting and building maven projet.
Deploy to Container Plugin -- Help to integrate with tomcat.
After all, this plugin installation do restart Jenkins
and do other config changes
Go to home page > manage jenkins > global tool configuration
Java configuration

Maven configuration

Email trigger Enabling
Go to jenkins home page > manager jenkins > global configuration - add below config

for testing of email make sure your antivious is not blocking it and your gmail accout is
allowing access for less secure app.
Setup of Job For the SpringBoot App
Go to Jenkins Home page > select new item > select maven project > add configuration as
below.
General section > GitHub project > give your github url of project
Source Code management > Git > give your repository cloning url
By default it will takes changes only from master branch changes if you wish you can modify
In Buld trigger section select Poll SCM give crone expression * * * * * -- this will enable to
poll changes for every minutes
In Email notification section give your emailId
In Post build section do changes as per below

In the post buld section we have to configure username/password of the tomcat
tomcat installation on your system and create folder inside tomcat >
webapps folder > (here like jenkins-demo) give this to context path,
That's all aboout setup , now go to jenkins home page click on created job and build now
it will build the project and deployed to context path of tomcat location , you can test your
by going to url - http:/localhost:8081/context_path_provided/hello
After this do any changes in your github project do commits , Jenkis will pick the changes
and build the war file and same will be deployed to context path location provided in tomcat setup
That's all about this article. Thanks for reading.
Jenkins is CD/CD tool, we will use this to automate our build process.
Download the Jenkins - https://jenkins.io/download/
Install the Jenkins as like normal software installation.
By defualt it will run on localhost:8080/ first time login it will ask for setup.
Initial password can be found location -jenkins/secrets/initialAdminPassword
Do the basics setup default plugin installation as these steps are very user friendly to not discussing in details and setup new password.
By running these commands on CMD ,we control the jenkins
- Jenkins.exe stop
- Jenkins.exe start
- Jenkin.exe restart
Jenkins Setup for Maven, Java, Git, Tomcat, Email trigger.
To setup for a job for our spring-boot project we need lot plugin in Jenkins
Go to jenkins home page > manage jenkins - plugin sections
GitHub integration Plugin -- Help to integrate with GitHub to automatically detects for new changes
Maven Integration Plugin -- Help to do maven related config setting and building maven projet.
Deploy to Container Plugin -- Help to integrate with tomcat.
After all, this plugin installation do restart Jenkins
and do other config changes
Go to home page > manage jenkins > global tool configuration
Java configuration

Maven configuration

Email trigger Enabling
Go to jenkins home page > manager jenkins > global configuration - add below config

for testing of email make sure your antivious is not blocking it and your gmail accout is
allowing access for less secure app.
Setup of Job For the SpringBoot App
Go to Jenkins Home page > select new item > select maven project > add configuration as
below.
General section > GitHub project > give your github url of project
Source Code management > Git > give your repository cloning url
By default it will takes changes only from master branch changes if you wish you can modify
In Buld trigger section select Poll SCM give crone expression * * * * * -- this will enable to
poll changes for every minutes
In Email notification section give your emailId
In Post build section do changes as per below

In the post buld section we have to configure username/password of the tomcat
tomcat installation on your system and create folder inside tomcat >
webapps folder > (here like jenkins-demo) give this to context path,
That's all aboout setup , now go to jenkins home page click on created job and build now
it will build the project and deployed to context path of tomcat location , you can test your
by going to url - http:/localhost:8081/context_path_provided/hello
After this do any changes in your github project do commits , Jenkis will pick the changes
and build the war file and same will be deployed to context path location provided in tomcat setup
That's all about this article. Thanks for reading.
Comments
Post a Comment